Laravel Overview
Laravel is an open-source PHP framework. It also offers the rich set of functionalities that incorporates the basic features of PHP frameworks such as Codelgniter, Yii, and other programming languages like Ruby on Rails.
Laravel is a PHP framework that uses the MVC architecture.
where,
- Framework: It is the collection of methods, classes, or files that the programmer uses, and they can also extend its functionality by using their code.
- Architecture: It is the specific design pattern that the framework follows. Laravel is following the MVC architecture.
In this example, You will learn that how to insert and retrieve data from the MySql database using laravel framework PHP.
Read also: Try Online Making Money Ideas with ChatGPT in 2024 (Beginner Friendly)
First, creating table the SQL query:
CREATE TABLE employee_details
(
id int NOT NULL AUTO_INCREMENT,
first_name varchar(50),
last_name varchar(50),
city_name varchar(50),
email varchar(50),
PRIMARY KEY (id)
);
Now, create three file for insert data in Laravel.
Step 1
Create a controller name as EmployeeInsertController.php.
The file location is : (app/Http/Controllers/EmployeeInsertController.php)
Step 2
Create view page name as employee_create.php
The file location is: (resources/views/employee_create.php)
Then put this code in your EmployeeInsertController.php.
<?php
namespace App\Http\Controllers;
use Illuminate\Http\Request;
use DB;
use App\Http\Requests;
use App\Http\Controllers\Controller;

class EmployeeInsertController extends Controller
{
    public function insertform(){
    return view('employee_create');
    }
        public function insert(Request $request){
        $first_name = $request->input('first_name');
        $last_name = $request->input('last_name');
        $city_name = $request->input('city_name');
        $email = $request->input('email');
        $data=array('first_name'=>$first_name,"last_name"=>$last_name,"city_name"=>$city_name,"email"=>$email);
        DB::table('employee_details')->insert($data);
        echo "Record inserted successfully.<br/>";
        echo '<a href = "/insert">Click Here</a> to go back.';
        }
        }
Then put this code in your employee_create.blade.php.
<!DOCTYPE html>
<html lang="en">
<head>
<title>Employee Management</title>
<meta charset="utf-8">
<meta name="viewport" content="width=device-width, initial-scale=1">
<link rel="stylesheet" href="https://maxcdn.bootstrapcdn.com/bootstrap/4.5.0/css/bootstrap.min.css">
<script src="https://ajax.googleapis.com/ajax/libs/jquery/3.5.1/jquery.min.js"></script>
<script src="https://cdnjs.cloudflare.com/ajax/libs/popper.js/1.16.0/umd/popper.min.js"></script>
<script src="https://maxcdn.bootstrapcdn.com/bootstrap/4.5.0/js/bootstrap.min.js"></script>
</head>
<body>
<div class="container">
<h2 class="text-center">Employee Management | Add</h2>
<br>
<form action = "/create" method = "post" class="form-group" style="width:70%; margin-left:15%;" action="/action_page.php">
<input type = "hidden" name = "_token" value = "<?php echo csrf_token(); ?>">
<input type = "hidden" name = "_token" value = "<?php echo csrf_token(); ?>">
<label class="form-group">First Name:</label>
<input type="text" class="form-control" placeholder="First Name" name="first_name">
<label>Last Name:</label>
<input type="text" class="form-control" placeholder="Last Name" name="last_name">
<label>City Name:</label>
<select class="form-control" name="city_name">
<option value="bhubaneswar">Bhubaneswar</option>
<option value="cuttack">Cuttack</option>
</select>
<label>Email:</label>
<input type="text" class="form-control" placeholder="Enter Email" name="email"><br>
<button type="submit"  value = "Add employee" class="btn btn-primary">Submit</button>
</form>
</div>
</body>
</html>
Step 3
Then go to routes as web.php and put this code.
The file location is : (routes/web.php)
Route::get('insert','EmployeeInsertController@insertform');
Route::post('create','EmployeeInsertController@insert');

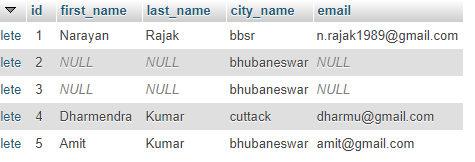
Then, you can see the data is inserted.
So, the data is inserted in the database, then we need to retrieve a record or data from the MySQL database.
Step 4
Create a controller for view name as EmployeeViewController.php.
The file location is : (app/Http/Controllers/EmployeeViewController.php)
Step 5
Create aview page name as employee_view.blade.php.
The file location is : (resources/views/employee_view.blade.php).
Then put this code EmployeeViewController.php.
<?php
namespace App\Http\Controllers;
use Illuminate\Http\Request;
use DB;
use App\Http\Controllers\Controller;
class EmployeeViewController extends Controller
{
 public function index(){
 $users = DB::select('select * from employee_details');
 return view('employee_view',['users'=>$users]);
 }
}
Then, retrieve the employee data then put this code employee_view.blade.php.
<!DOCTYPE html>
<html lang="en">
<head>
<title>View Employee Records</title>
<meta charset="utf-8">
<meta name="viewport" content="width=device-width, initial-scale=1">
<link rel="stylesheet" href="https://maxcdn.bootstrapcdn.com/bootstrap/4.5.0/css/bootstrap.min.css">
<script src="https://ajax.googleapis.com/ajax/libs/jquery/3.5.1/jquery.min.js"></script>
<script src="https://cdnjs.cloudflare.com/ajax/libs/popper.js/1.16.0/umd/popper.min.js"></script>
<script src="https://maxcdn.bootstrapcdn.com/bootstrap/4.5.0/js/bootstrap.min.js"></script>
</head>
<body>
<div class="container">
<h2 class="text-center">View Employee Records</h2>
<table class="table table-bordered table-striped">
    <thead>
      <tr>
        <th>ID</th>
        <th>First Name</th>
        <th>Last Name</th>
        <th>City Name</th>
        <th>Email</th>
      </tr>
    </thead>
    <tbody>
    @foreach ($users as $user)
      <tr>
      <td>{{ $user->id }}</td>
      <td>{{ $user->first_name }}</td>
      <td>{{ $user->last_name }}</td>
      <td>{{ $user->city_name }}</td>
      <td>{{ $user->email }}</td>
      </tr>
      @endforeach
    </tbody>
</table>
</div>
</body>
</html>
Step 6
Then go to routes as web.php and put this code.
The file location is (routes/web.php)
Route::get('view-records','EmployeeViewController@index');
Then, you can see the view page.

